2.3 Windows IDE
On the Windows platform Hollywood comes with a fully-featured integrated
development environment (IDE) which can be used to create Hollywood projects
very easily. The IDE features a multi-tabbed text editor with syntax highlighting,
live help while typing, a function browser as well as a convenient overview of
external data referenced by the preprocessor commands used in your script.
Here's a screenshot of Hollywood's Windows IDE:

As you can see the IDE is made up of six different parts:
- On the upper left-hand side of the IDE there is the Project browser treeview.
It is divided into the trees "Examples" and "My projects". All "Examples" that are
delivered with Hollywood are listed in the first tree whereas your own projects appear in the
second tree. To add items to the "My projects" tree, simply press the "Add"
button that is located below the treeview. To remove items from the "My projects",
use the "Remove" button.
- On the lower left-hand side of the IDE you can find the Info corner.
This section displays some information about the currently active Hollywood
project. This is currently only implemented for the example projects that come
with Hollywood. If you select one of your own projects the info corner will
display nothing.
- The Editor constitutes the heart of the IDE and is located in the center
of the IDE. The editor will automatically display live help in the IDE's status
bar if it detects you typing in a known Hollywood command. It will also highlight
all keywords and comments, and it will automatically add function names to the
function browser (see below). If you right-click your mouse on the editor area,
a context menu will pop up allowing you to jump to the definition of the function
that is currently selected by the cursor or opening the file that is currently
selected by the cursor. You can also get context sensitive help this way.
- On the upper right-hand side of the IDE you can find the Function browser.
This listview contains the names of all functions that have been declared by the
currently active project. The list is updated on-the-fly as you edit your script.
You can double-click on a name in this list to jump to the function declaration
automatically.
- On the lower right-hand side of the IDE there is the Preprocessor command tool.
In the first tab you can configure several attributes of the @DISPLAY
preprocessor command which controls the appearance of your display. You can for
example specify the initial position of the display on the desktop screen, whether
or not it should open in full screen mode, or if the display should have a border
and a size widget. You can also set the title of the display (defaults to "Hollywood").
Of course, you can also configure all these attributes directly in the editor by
passing them to @DISPLAY preprocessor command directly. In fact,
when you edit these attributes using the preprocessor command tool, it will immediately
update the corresponding line that contains the @DISPLAY specification
in your script. If there is none, the preprocessor command tool will add it your
script. The other tabs in the preprocessor command tool contain listviews that show
all external files referenced by the currently active script. If you click on one
of the files, the IDE will jump to the point where this file has been declared in
the script. If you double-click on one of the files, the IDE will open Hollywood to
show the file.
- On the bottom of the IDE you can find the Hollywood output window. Whenever
the IDE starts Hollywood, its output will be redirected to this window. You can also
print to this window from your Hollywood script by using the DebugPrint()
command. You can clear the contents of this window by opening the context menu with
the right mouse button and selecting "Clear" then.
Most of the IDE constituents presented above are implemented using dock windows.
This means that you can rearrange them according to your personal tastes: You can
drag them to a different place in the IDE window or you can even move them out of
the IDE window. In that case they will appear as toolbox windows. Finally, you can
also hide them if you do not need their functionality. To hide one of these windows,
either use the "View" menu or drag the docks out of the window and then close their
toolbox window.
The IDE can be controlled either through the toolbar that appears in the top of
the window or using the menu. There are also keyboard shortcuts that you can use.
Live help is displayed in the status bar when the mouse is over a toolbar or menu
item. You can use the toolbar and the menu to run the current project, compile it,
record a video of it, or send it to your printer. Furthermore, several standard
functions are accessible in toolbar and menu like "Save", "Save as", "Find",
"Find and replace", "Copy", "Cut", "Paste", "Undo", "Redo", and so on.
The rightmost button in the toolbar allows you to conveniently switch between Hollywood
and Miniwood. If you press the button, a pop-up that allows you to select either
Hollywood or Miniwood will open. The Windows IDE will also automatically remember
the current state of this button when closing the program so that it's still in
the last state the next time you start the IDE. See Miniwood to learn about the differences between Hollywood and Miniwood.
The IDE can also be controlled using keyboard shortcuts. Here are some common
shortcuts:
F1:-
Opens context sensitive help for the function/keyword that is at the current cursor
position.
F2:-
Jumps to the declaration of the function at the current cursor position.
F4:-
Opens the file whose name is at the current cursor position.
F5:-
Runs the current project in Hollywood.
Ctrl-F:-
Opens the find dialog to search for a string inside the current project.
Ctrl-G:-
Jumps to a specific line in the project.
Ctrl-S:-
Saves the current project.
Several IDE settings are user-configurable. Select the entry "IDE settings..."
from the "File" menu to open a dialog that allows you to adjust several settings
to your personal taste. The settings dialog consists of four pages: General, Editor,
Hollywood, and Custom. Here is a screenshot of the first page:
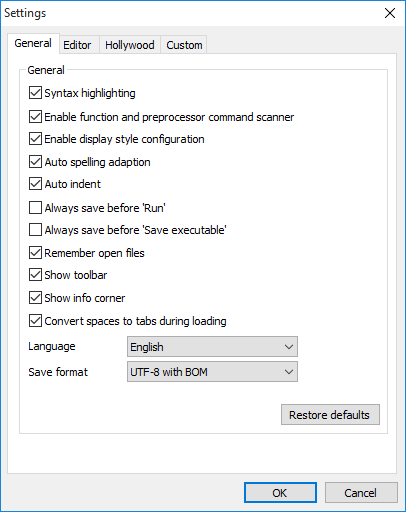
The following things can be configured on this page:
- ‘Syntax highlighting’
-
Tick this box to enable syntax highlighting in the IDE's script editor. Normally
this setting should be enabled because it makes your code much more readable.
On very slow systems or if you work with extremely large scripts it might be
necessary to turn it off for performance reasons.
- ‘Enable function and preprocessor command scanner’
-
If you enable this option, the IDE will automatically add all function names
to the function browser and it will add all files referenced by preprocessor
commands to the preprocessor command tool. This is only worth disabling on very
slow systems or with very large scripts.
- ‘Enable display style configuration’
-
If this option is enabled, you will be able to configure the parameters of
the @DISPLAY preprocessor command using the preprocessor
command tool in the lower right-hand side of the IDE. If you do not want that,
leave this box unchecked.
- ‘Auto spelling adaptation’
-
This box allows you to configure whether or not the IDE should automatically
adapt the spelling of commands and keywords it knows. For instance, if you
type
waitleftmouse and this option is enabled, the spelling will
automatically be corrected into WaitLeftMouse.
- ‘Auto indent’
-
Check this box if you want the IDE to automatically indent the code after
statements that open a new code scope (for example
If, While, Function etc.).
If you enable this option, the IDE will indent the next line by inserting
a tab character. This is very useful for code readability and should not
be turned off.
- ‘Always save before Run’
-
If you tick this box, the IDE will always save your current project automatically
when you run it. Be careful with this option because you might lose some
important changes.
- ‘Always save before Compile’
-
If you tick this box, the IDE will always save your current project automatically
when you compile it into an executable.
- ‘Remember open files’
-
Tick this box to tell the IDE that it should remember all tabs that were
open in the previous session for the next session.
- ‘Show toolbar’
-
You can use this option to configure whether or not you want the toolbar to be
shown.
- ‘Show info corner’
-
You can use this option to configure whether or not you want the info corner
to be shown.
- ‘Convert spaces to tabs during loading’
-
This option allows you to configure whether or not you want spaces to be
converted into tabs before loading. This is a useful option because it is
much easier to structure your code using tabs instead of spaces but be
careful because it might destroy the layout of your code if you use a
differing tab settings between the Hollywood IDE and other text editors.
You can configure the tab space on the "Editor" page.
- ‘Keep help window on top’
-
If you activate this option, Hollywood's help window will always appear on top
of all other windows that belong to the IDE.
- ‘Don't close tab on double-click’
-
Normally, tabs can be closed by double-clicking on them. If you don't want
that, activate this option.
- ‘Language’
-
This widget allows you to change the language used by the IDE. You will
have to restart the IDE for this change to take effect.
- ‘Save format’
-
You can set the script's output format here. Normally, this should always
be UTF-8, either with or without BOM. ISO 8859-1 shouldn't be used any
longer since it can lead to compatibility problems on systems with a different
locale.
- ‘Restore defaults’
-
Use this button to reset all settings on this page to their default values.
The second page allows you to configure the appearance of the editor:

- ‘Colors’
-
You can use these buttons to adjust the colors used by the editor for
syntax highlighting to your personal tastes.
- ‘Font’
-
The font you specify here is used by the editor. You must use a fixed-width
font here. Otherwise the layout will get messed up.
- ‘Console font’
-
The font you specify here is used by the console window. You can use a
monospace or proportional font here.
- ‘Tab size’
-
Here you can specify the tab width that should be used by the editor. You
can choose between a tab width of 2, 4, 6, and 8 space characters.
- ‘Restore defaults’
-
Use this button to reset all settings on this page to their default values.
The third page allows you to configure the Hollywood interface:
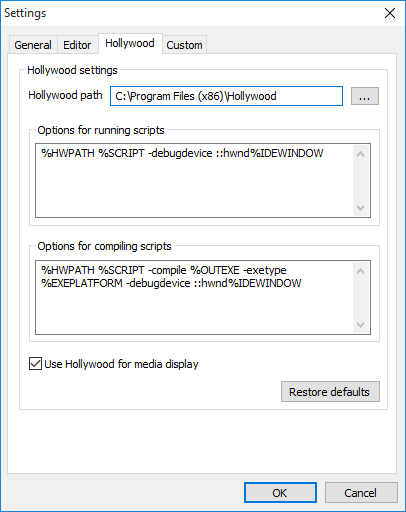
- ‘Hollywood path’
-
This field must be set to the path where Hollywood is located. Whenever
the IDE invokes Hollywood, it will look for it in the path specified
here. Normally, Hollywood resides in the same path as the IDE executable.
- ‘Options for running scripts’
-
The template specified in this text box is used by the IDE to run a
Hollywood script. Normally, you do not have to change anything here. See
below for tokens that can be used here.
- ‘Options for compiling scripts’
-
The template specified in this text box is used by the IDE to compile a
Hollywood script. Normally, you do not have to change anything here. See
below for tokens that can be used here.
- ‘Use Hollywood for media display’
-
Check this box if you want the IDE to use Hollywood to show any external
media files like images and animations. It is recommended to enable
this option because Hollywood supports several exotic formats like IFF
ILBM and Protracker modules which are not supported by the standard
media viewers that come with Windows.
- ‘Restore defaults’
-
Use this button to reset all settings on this page to their default values.
The following tokens can be specified in the template that is used to
start Hollywood to run or compile a script:
%HWPATH:-
This token will be replaced by the path to the Hollywood executable.
%SCRIPT:-
This token will be set to the Hollywood script that should be compiled.
%IDEWINDOW:-
This token inserts the handle of the IDE window.
%OUTEXE:-
Points to a destination file that should be created by the compiler.
%EXEPLATFORM:-
Points to one or more platforms that the compiler should target.
The fourth page allows you to add custom keywords that should be taken
into account by the editor:

If you want the editor to highlight other keywords than the predefined
ones, you can add those keywords here. Please note that keywords must
always start with an alphabetic letter or an underscore. They can contain
numbers but not in initial position. The only special characters allowed
are the underscore, the dollar sign and the exclamation sign. Other characters
are not allowed. There must only be one keyword per line.
Show TOC